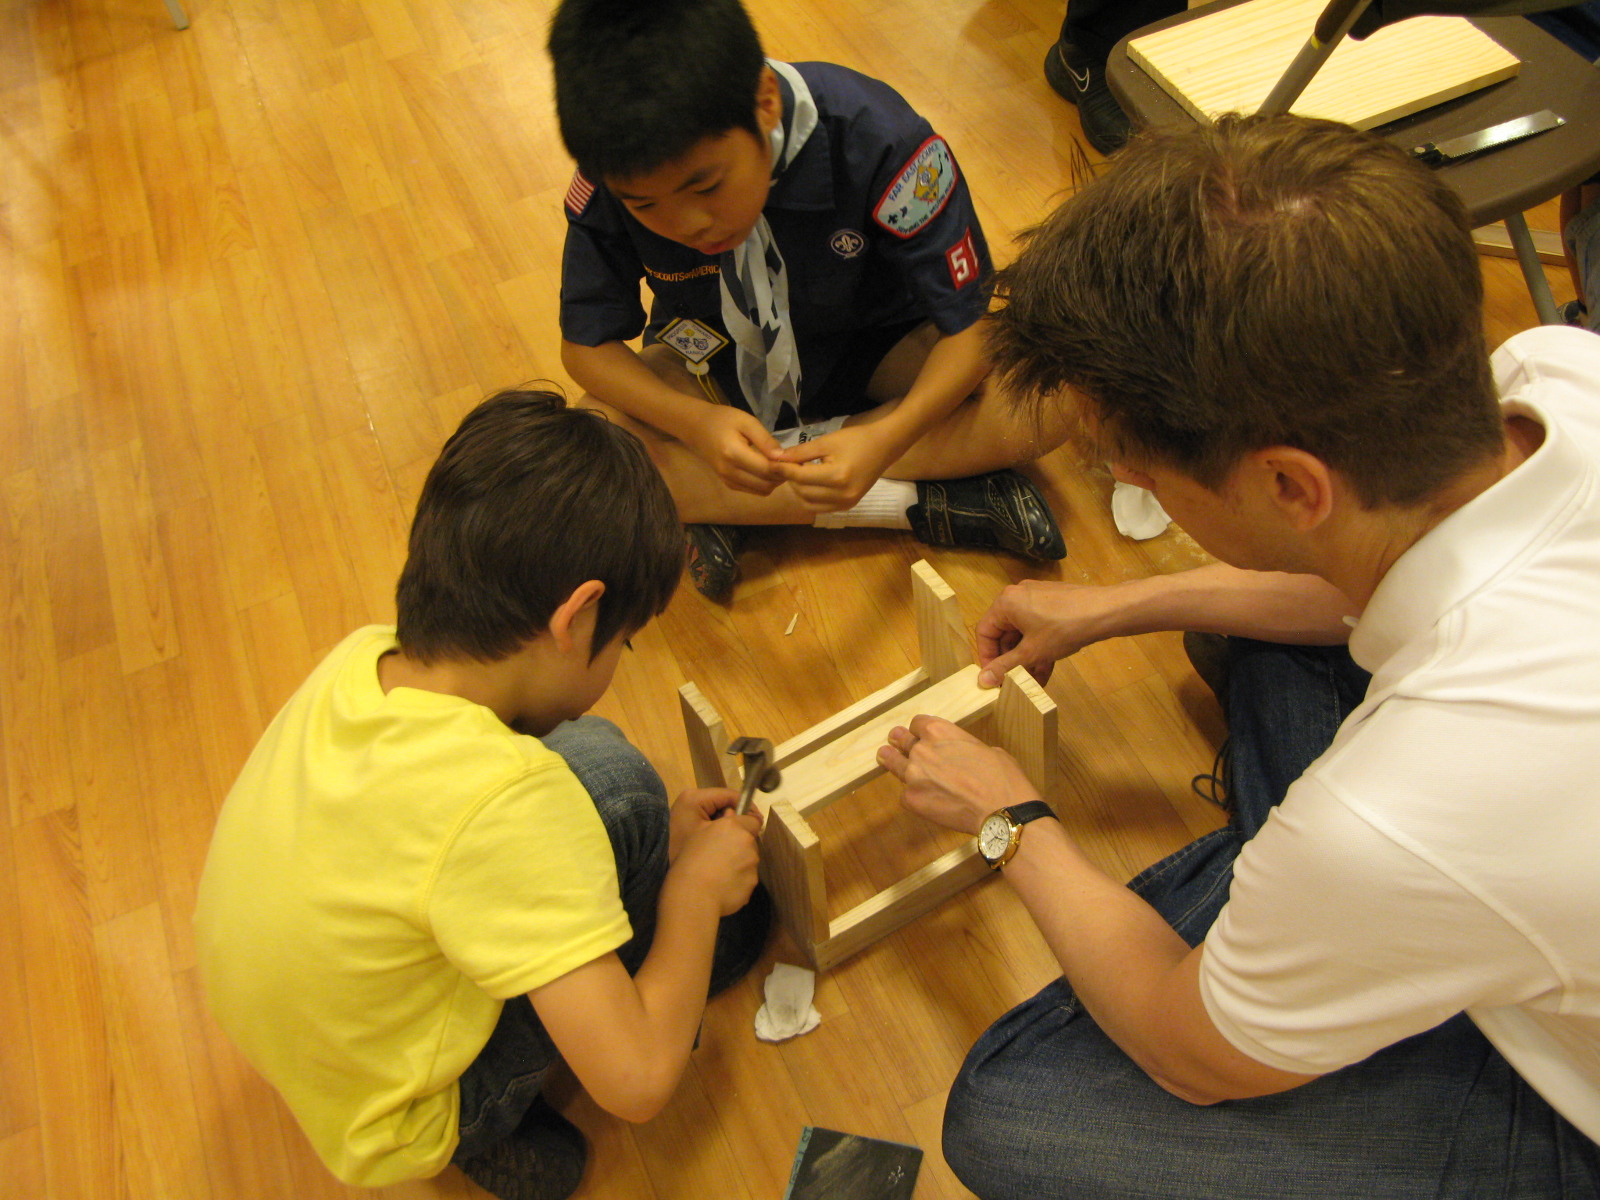
Our pack activity for Friday evening included an exercise in construction.
First the wood was cut to make three equal length sections.
We used a small Japanese hand saw. The wide blade helps the saw cut straight and the teeth cut as you pull.
After adding a touch of wood glue, the sides were nailed at each end.
The Cubs worked together as a team, the older boys helping the younger ones.
A bit of coaching came from leaders.
Our activities include siblings as well.
(I was once the twin sister who had to sit on the sidelines).
After the sides were nailed in place, the third section was nailed to the bottom.
Finally the top was nailed in place.
The finish!
Line up in order of height with the shortest team member on the stool making the Scout sign.
Were those stools strong?
Did they work?
Did we have fun ... and learn something?
You bet!
And every participant got a saw and hammer activity segment.
The stools went home with the shortest team member, to use helping mom around the house.
And the best part was, I didn't have to carry all those supplies back home!
I love Scouting!
Friday, June 14, 2013
Tuesday, April 9, 2013
The Cubmaster's Challenge
For a few years, in my early Scouting days, I was an assistant Webelos leader until that position became open to women. When I moved up into the leadership of the den, the Webelos program was extended to two years. I saw many scouts having reached the requirements for Arrow of Light and then just wasting time until they qualified to graduate into Boy Scouts.
Each year there were a few boys who set the goal and made it.
The challenge came with a neckerchief slide. This was carved from "buna", a very hard Japanese beech.
The 12 points of the Scout Law were written on the revolving ball in the cage.
Then, one year, a particular den took on the challenge together and suddenly I was facing the possibility of carving many of those slides. I do not have any on hand, as like the Eagle slides, I carve each one for a particular boy once I get word of their completion.
With that in consideration, I knew it was not a slide I could whip out in a day to have ready to present at the graduation ... especially when several boys were down to the end of the wire on completion.
I have since changed the award to this slide. I was able to complete these three in just two days and they will be presented later this week. The reverse side will have the twelve points of the Scout law and "Be Prepared" written in pen, plus the name of the youth.
It has been interesting to watch these Scouts over the years because many of these goal-setters go on to replace this slide with an Eagle carving.
When I cut out the blanks, I thought the wood I had selected was Hinoki, one of my favorites for carving, but as I began whittling, It was clear this was something else. Hinoki is rather expensive but often comes in nice cuts of a convenient size, I am beginning to see cheaper imports from Asia being substituted in the craft stores. I had looked at the thickness and grain and probably should have checked the little sticker on the end of the piece.
This wood was a bit harder and knife cuts were difficult to sand off. I enjoyed thinking of the three boys. One of them I have known from his pre-school days and hope to know in years to come. In a Pack where families come and go each year, where requirements are written for a smaller community that speaks English, to find three youth giving the challenge a serious try is a great reward for time spent in Scouting.
The 12 points of the Scout Law were written on the revolving ball in the cage.
Then, one year, a particular den took on the challenge together and suddenly I was facing the possibility of carving many of those slides. I do not have any on hand, as like the Eagle slides, I carve each one for a particular boy once I get word of their completion.
With that in consideration, I knew it was not a slide I could whip out in a day to have ready to present at the graduation ... especially when several boys were down to the end of the wire on completion.
I have since changed the award to this slide. I was able to complete these three in just two days and they will be presented later this week. The reverse side will have the twelve points of the Scout law and "Be Prepared" written in pen, plus the name of the youth.
It has been interesting to watch these Scouts over the years because many of these goal-setters go on to replace this slide with an Eagle carving.
When I cut out the blanks, I thought the wood I had selected was Hinoki, one of my favorites for carving, but as I began whittling, It was clear this was something else. Hinoki is rather expensive but often comes in nice cuts of a convenient size, I am beginning to see cheaper imports from Asia being substituted in the craft stores. I had looked at the thickness and grain and probably should have checked the little sticker on the end of the piece.
This wood was a bit harder and knife cuts were difficult to sand off. I enjoyed thinking of the three boys. One of them I have known from his pre-school days and hope to know in years to come. In a Pack where families come and go each year, where requirements are written for a smaller community that speaks English, to find three youth giving the challenge a serious try is a great reward for time spent in Scouting.
Tuesday, April 2, 2013
Still more Pinewood Derby cars
After finishing the Zodiac series, I have gone back to puzzling over what to do each year.
Since 2007 was Scouting's anniversary year, I made a car of "B.P.,resting up for 100 more years.
And another view of the same car. The patrol flag is attached to the top of his walking stick.
2008 "Red Arrow"
Modeled after the OA arrowhead, I thought this car would be a lot faster than it was.
2009, another anniversary year for Scouting, I made an American Eagle.
Taking a lesson from the cock car, I tucked the feet underneath.
He got a prize at the District open competition.
2010
"Carpe Diem" is modeled after the carp streamers flown on May 5th for "Boy's Day".
A "Winning Smile" 2011 was not hard to make and it ran quite well.
This " Good Luck Cat" was a winner in 2012.
The right paw raised beckons in good luck and he is holding a lucky coin in the other paw.
This car took first place in the Pack and District competitions.
I guess he was lucky.
This year's car, 2013, was "Very Hungry for Victory"
Unfortunately, he hit a snag the first time down the track and flipped over.
The track had been assembled by our sponsoring organization without a whole lot of understanding about putting the rails together. We could fix some parts with a socket wrench but next run he flipped again and broke a wheel which sailed across the room, hitting the far wall.
He limped to the end of the track and failed to place. This is the first time my car was not even in the running ... much to the joy of my competitors. I rather imagine I will not be allowed to forget this one!.
So, that is my car history. Many of these cars have participated in the BSA National Jamboree over the years, on display in the Boys'Life Whittlers booth. I have been told there will be no Whittling display at this year's Jambo.
They have also appeared on display at both American and Japanese derby races. I am always looking for ideas for next year so if you have any good ideas, please leave me a comment.
More Pinewood Derby cars - the Zodiac Years
From 1994, I began a series of cars, each representing the current year in the oriental Zodiac. The cycle should begin with the Year of the Rat, but Since it is a cycle, I guess anywhere is fine to begin anywhere.
1994 was the "year of the dog" and as a model, I used my pet beagle, Megumi-hime or just "Meg".
She was pretty old by then and spent a lot of time dreaming, so this car is called "Dreams of Victory".
I put a small spring from a ballpoint pen on the tail and it wags as the car rolls.
1995 was the year of the wild boar (pig).
This is the "Road Hog", bringing home the bacon.
The tail is left-over basketry cane.
The pink paint shows off the graphite so he looks plenty dirty.
1996, Rats! Here comes the big cheese!
The ears are glued on and the tail is on a spring.
Since it tends to get played with when on display, the tail needs a new spring from time to time.
1997 was the year of the ox.
Here is "Babe, the Big Blue ...that's no bull ... Ox.
His head is weighted to bow up and down and attached to a hook in the opening. The ears are leather and the tail braided cord.
He had to be run down the track backwards because his head came off when he hit the end of the track.
This is made of two car blocks glued together,
"Grrrreat"! was made for the year of the tiger.
1998
The tail fits into a hole on the back end.
"A Hare Ahead" hopped into the hare year, 1999.
The pom-pom of a tail has gotten a bit of hard wear over the years.
The year of the dragon. 2000, got a "Dragster".
This is also made from two blocks glued together.
His horns are tree twigs and get broken off regularly.
2001 was the year of the snake.
This could be a rattle snake because there is a bee-bee in the tail section that rattles at the end of the spring....
But, if you look again, you can tell it is a "Bowline Constrictor"
He was very fast as the other cars moved over and let him by.
You may think this is a zebra but 2002 was the horse year and this is a " horse of a different color".
(Cub colors) of course.
The tail is blue fish-line.
I added half a block for his head.
"Rambo" represented the "year of the sheep", 2003
This was also carved from two blocks glued together.
For 2004, the monkey year, I made "Monkey Business"
These are the three monkeys carved at Nikko,
see no evil, hear no evil, speak no evil.
I think the monkey in front was hiding his eves out of fear.
This was also made with two blocks. The surface was wood-burned to give it texture, hands and faces painted.
The "Feathered flyer" represented 2005, the year of the cock.
By now I guess you can see that I added wood from old kits when I needed height.
I had a bit of trouble coming up with a chicken-like design but when visiting a shrine near my home at the time, I saw a cock with a long colorful and flowing tail and thought that would work.
This little guy was fast too.
As I began with the "Year of the dog" I had planned to finish with the cock year, but by then, my beagle had moved on to dog heaven and we had a new canine daughter.
Unlike Meg, Nikko loves to run and roll and chase sticks. Therefore 2006 I had to make one more dog-year dog.
This is Nikko, "My year, My Way"!
13 years of zodiac cars. The tradition continues.
If you are looking for an idea that looks like a car, don't bother with any more posts as you are unlikely to find one.
I have noticed over the last few years that the Cubs in my pack are also getting very creative. Recently we have begun holding "Rough cut" days where the kids can come and we provide the tools and help so they can cut out their car shapes. I think having a room full of kids working on their own cars helps to cut down on adult-made products. It is also a help because very few ex-pats arrive in Tokyo with more than a screw-driver.
A post of recent cars will follow.
1994 was the "year of the dog" and as a model, I used my pet beagle, Megumi-hime or just "Meg".
She was pretty old by then and spent a lot of time dreaming, so this car is called "Dreams of Victory".
I put a small spring from a ballpoint pen on the tail and it wags as the car rolls.
1995 was the year of the wild boar (pig).
This is the "Road Hog", bringing home the bacon.
The tail is left-over basketry cane.
The pink paint shows off the graphite so he looks plenty dirty.
1996, Rats! Here comes the big cheese!
The ears are glued on and the tail is on a spring.
Since it tends to get played with when on display, the tail needs a new spring from time to time.
1997 was the year of the ox.
Here is "Babe, the Big Blue ...that's no bull ... Ox.
His head is weighted to bow up and down and attached to a hook in the opening. The ears are leather and the tail braided cord.
He had to be run down the track backwards because his head came off when he hit the end of the track.
This is made of two car blocks glued together,
"Grrrreat"! was made for the year of the tiger.
1998
The tail fits into a hole on the back end.
"A Hare Ahead" hopped into the hare year, 1999.
The pom-pom of a tail has gotten a bit of hard wear over the years.
The year of the dragon. 2000, got a "Dragster".
This is also made from two blocks glued together.
His horns are tree twigs and get broken off regularly.
2001 was the year of the snake.
This could be a rattle snake because there is a bee-bee in the tail section that rattles at the end of the spring....
But, if you look again, you can tell it is a "Bowline Constrictor"
He was very fast as the other cars moved over and let him by.
You may think this is a zebra but 2002 was the horse year and this is a " horse of a different color".
(Cub colors) of course.
The tail is blue fish-line.
I added half a block for his head.
"Rambo" represented the "year of the sheep", 2003
This was also carved from two blocks glued together.
For 2004, the monkey year, I made "Monkey Business"
These are the three monkeys carved at Nikko,
see no evil, hear no evil, speak no evil.
I think the monkey in front was hiding his eves out of fear.
This was also made with two blocks. The surface was wood-burned to give it texture, hands and faces painted.
The "Feathered flyer" represented 2005, the year of the cock.
By now I guess you can see that I added wood from old kits when I needed height.
I had a bit of trouble coming up with a chicken-like design but when visiting a shrine near my home at the time, I saw a cock with a long colorful and flowing tail and thought that would work.
This little guy was fast too.
As I began with the "Year of the dog" I had planned to finish with the cock year, but by then, my beagle had moved on to dog heaven and we had a new canine daughter.
Unlike Meg, Nikko loves to run and roll and chase sticks. Therefore 2006 I had to make one more dog-year dog.
This is Nikko, "My year, My Way"!
13 years of zodiac cars. The tradition continues.
If you are looking for an idea that looks like a car, don't bother with any more posts as you are unlikely to find one.
I have noticed over the last few years that the Cubs in my pack are also getting very creative. Recently we have begun holding "Rough cut" days where the kids can come and we provide the tools and help so they can cut out their car shapes. I think having a room full of kids working on their own cars helps to cut down on adult-made products. It is also a help because very few ex-pats arrive in Tokyo with more than a screw-driver.
A post of recent cars will follow.
Monday, April 1, 2013
Pinewood Derby - Open competition
A year ago in April, it was pinewood derby time and I posted pictures of the cars made by my two sons.
Now I thought it time to post a few cars that were made by me.
At the time I moved into the Cubmaster's job, I wanted to encourage the dads/parents to allow the Cubs to make their own cars. If they wanted to get competitive, they should race each other and me.
I began whittling cars in 1982.
This "Coakster" was my first effort. The back end says, "recycled to save energy".
This is made with two blocks glued together. pull-tabs were a new thing at that time and have undergone changes over the years.
In 1983, I carved a bobsled out of the block and fastened on little plastic figures of a bobcat, wolf, and bear. (There were no tiger cubs in those days).
I'm not sure where that car is now but i think the animals were removed for kids to play with.
1984 was the "Top Banana".
I added scrap wood to the end to give some height.
Yes, and I stole a "Chiquita Banana sticker from a real bunch.
In the fall of 1984, I took the "old" Woodbadge course and returned home a beaver ... an "All-gnawing Beaver" at that!
No trouble figuring out what to carve that year. I carved the beaver separately and glued him to the log. This was a fast car.
The back end says, "Nice gnawing you"!
In 1986, my car was an E-racer.
Not a lot of hard work to this one.
In 1987 I was carving ball and chain neckerchief slides for the "Cubmaster's Challenge"
I will tell more about that in a later post.
This car is the "missing link" I couldn't cut the links all the way through and make it work but the ball in the cage turns with the vibration of the wheels.
Sweet Victory"
In 1988, I got down to the end of the wire and needed a quickie car. I took a block of wood and cut it to the same size as this candy bar, saving the wrapper.
All I had to do was put the wrapper on the wood and add the wheels.
Of course, some neatnick in my house kept tossing out the opened wrappers so this car took a lot of eating to complete.
I have always been a bit amazed at the size and speed of Japanese cockroaches. (gokiburi)
This "Go-car-buri" has cane antenna and was quite fast.
His other name might be the "Car croach".
The antenna are left-over basketry reed.
"S-Car-Go" ( "S" for Scout) was made in 1990
It was made from one block of "Hinoki" wood and hollowed out to remove the excess weight.
"A Jump Ahead" was carved from two blocks glued together.
The antenna are made from coat-hanger wire. This car has had a lot of handling over the years and so the wire is pretty beaten up.
1991 , and I think he won that year.
1992, The "Mobile Richard" was out for a whale of a ride.
I think he was also a winner.
His water-spout is made of nylon fish-line.
The last car in this selection is ...
Slow and Steady Wins the Race.
1993 ... and it was a very fast car.
I couldn't add a tail to the rabbit and meet the length requirements so I glued on some fine fluffy feathers.
They have since been ravaged by moths.
As one might imagine, after 12 years of cars, my contribution to the races had become somewhat of a tradition. We opened the competition not only to fathers but to mothers, sisters, Den Chiefs, and anyone else who wanted to try their luck at beating me.
Each year It was a real challenge to come up with a new idea. I solved the next years with cars representing the year of the oriental zodiac. Those will be my next post.
Now I thought it time to post a few cars that were made by me.
At the time I moved into the Cubmaster's job, I wanted to encourage the dads/parents to allow the Cubs to make their own cars. If they wanted to get competitive, they should race each other and me.
I began whittling cars in 1982.
This "Coakster" was my first effort. The back end says, "recycled to save energy".
This is made with two blocks glued together. pull-tabs were a new thing at that time and have undergone changes over the years.
In 1983, I carved a bobsled out of the block and fastened on little plastic figures of a bobcat, wolf, and bear. (There were no tiger cubs in those days).
I'm not sure where that car is now but i think the animals were removed for kids to play with.
1984 was the "Top Banana".
I added scrap wood to the end to give some height.
Yes, and I stole a "Chiquita Banana sticker from a real bunch.
In the fall of 1984, I took the "old" Woodbadge course and returned home a beaver ... an "All-gnawing Beaver" at that!
No trouble figuring out what to carve that year. I carved the beaver separately and glued him to the log. This was a fast car.
The back end says, "Nice gnawing you"!
In 1986, my car was an E-racer.
Not a lot of hard work to this one.
In 1987 I was carving ball and chain neckerchief slides for the "Cubmaster's Challenge"
I will tell more about that in a later post.
This car is the "missing link" I couldn't cut the links all the way through and make it work but the ball in the cage turns with the vibration of the wheels.
Sweet Victory"
In 1988, I got down to the end of the wire and needed a quickie car. I took a block of wood and cut it to the same size as this candy bar, saving the wrapper.
All I had to do was put the wrapper on the wood and add the wheels.
Of course, some neatnick in my house kept tossing out the opened wrappers so this car took a lot of eating to complete.
I have always been a bit amazed at the size and speed of Japanese cockroaches. (gokiburi)
This "Go-car-buri" has cane antenna and was quite fast.
His other name might be the "Car croach".
The antenna are left-over basketry reed.
"S-Car-Go" ( "S" for Scout) was made in 1990
It was made from one block of "Hinoki" wood and hollowed out to remove the excess weight.
"A Jump Ahead" was carved from two blocks glued together.
The antenna are made from coat-hanger wire. This car has had a lot of handling over the years and so the wire is pretty beaten up.
1991 , and I think he won that year.
1992, The "Mobile Richard" was out for a whale of a ride.
I think he was also a winner.
His water-spout is made of nylon fish-line.
The last car in this selection is ...
Slow and Steady Wins the Race.
1993 ... and it was a very fast car.
I couldn't add a tail to the rabbit and meet the length requirements so I glued on some fine fluffy feathers.
They have since been ravaged by moths.
As one might imagine, after 12 years of cars, my contribution to the races had become somewhat of a tradition. We opened the competition not only to fathers but to mothers, sisters, Den Chiefs, and anyone else who wanted to try their luck at beating me.
Each year It was a real challenge to come up with a new idea. I solved the next years with cars representing the year of the oriental zodiac. Those will be my next post.
Friday, February 1, 2013
Whittling Chit
Today I am preparing for teaching the whittling chit to Bears and Webelos in Two Tokyo Packs.
For preparation, all the blanks are cut out. We will use Olfa craft knives which work well both left and right handed/
The Bears will make bear neckerchief slides. The wood used tomorrow will be Hinoki. The samples are Katsura and Hinoki.. The nose piece on the blanks I made are Honoki ... Broad-leafed Magnolia.
The Webelos will make Scout signs. I used Honoki for these but I have some earlier cut pieces of Spruce.
I will take my camera but, knowing me, may be too busy to take pictures. I hope at least to get pictures of some of the finishes.
I have seen this taught with bars of soap and plastic knives. Not only was it a problem because the Cub Scouts did not have a vision of an object in the soap, but ended up with a mess, a waste of soap, and nothing memorable ...or even a good idea of how to handle a real knife.
On the other hand, over all the years I have taught this, each child has taken home an object to remind him of his success. Every bear turns out differently and unique. We use lots of sandpaper glued to Popsicle sticks
to smooth out the rough places.
Over the years we have had nicks ... but not many, and nothing a band aid couldn't take care of. My biggest challenge is not the sharp knives in the hands of boys, it is the "helicopter parents" hovering over the boys, ready to grab that knife and give it a few whacks too.
For preparation, all the blanks are cut out. We will use Olfa craft knives which work well both left and right handed/
The Bears will make bear neckerchief slides. The wood used tomorrow will be Hinoki. The samples are Katsura and Hinoki.. The nose piece on the blanks I made are Honoki ... Broad-leafed Magnolia.
The Webelos will make Scout signs. I used Honoki for these but I have some earlier cut pieces of Spruce.
I will take my camera but, knowing me, may be too busy to take pictures. I hope at least to get pictures of some of the finishes.
I have seen this taught with bars of soap and plastic knives. Not only was it a problem because the Cub Scouts did not have a vision of an object in the soap, but ended up with a mess, a waste of soap, and nothing memorable ...or even a good idea of how to handle a real knife.
On the other hand, over all the years I have taught this, each child has taken home an object to remind him of his success. Every bear turns out differently and unique. We use lots of sandpaper glued to Popsicle sticks
to smooth out the rough places.
Over the years we have had nicks ... but not many, and nothing a band aid couldn't take care of. My biggest challenge is not the sharp knives in the hands of boys, it is the "helicopter parents" hovering over the boys, ready to grab that knife and give it a few whacks too.
Tuesday, January 1, 2013
The Pack helps the Cub Scout grow.
I have been told that the BSA is getting rid of the Cub Scout Promise and Law of the Pack and going to use the same as the Boy Scouts. In my opinion, that is a big mistake. I have worked with this age children all my life and teaching them the meaning of "Mentally awake and morally straight" is too far over their heads, let alone those twelve points of the Scout Law! My Cub's books still have the old promise and law, so that is what we are still using.
Our pack gives segments for activities and many events include patches. I decided it might be useful for the Cubs to have a patch vest.
After reciting the law of the pack, I told the Cubs that the pack was going to help the Cub Scout grow, and that growing does not just mean getting bigger because they will do that anyway, with or without the Scouts.
Growing at that meeting meant getting new skills that they can use all their life.
During summer camp, a leader had a patch coming off his uniform and, knowing I was a quilter, asked if I had any thread to fix his patch. Well, I didn't have the right color but I told him I would sew it for him in a way the color of the thread would not matter.
While I was making those repairs, two of the youth staff came over and asked me to teach them to sew their own patches and badges in place. You can bet I was very happy to teach them.
Now it was my Cub's turn to learn to sew. I bought about six meters of red felt and made a pattern that only needed sewing across the two shoulder seams.
I was happy to see the moms encouraging and coaching but letting the boys do the work themselves. I did not hear one word of complaint from any kid.
Sitting at the back table, checking the boy's books, is my Right-hand-man, committee chair and Assistant Cub master all in one. He is supervising the next stage, the hammering of the grommets. Ah, the hammering part was the final reward for getting the sewing part done.
Next Pack meeting we will fix the ties in place while learning some basic knots. Maybe I will even get a picture of a Cub in a vest.
I am not so old that I can not look back to my own childhood and remember how I felt while using something I had made, thinking, "and I did this all by myself"! Good going boys!
Our pack gives segments for activities and many events include patches. I decided it might be useful for the Cubs to have a patch vest.
After reciting the law of the pack, I told the Cubs that the pack was going to help the Cub Scout grow, and that growing does not just mean getting bigger because they will do that anyway, with or without the Scouts.
Growing at that meeting meant getting new skills that they can use all their life.
During summer camp, a leader had a patch coming off his uniform and, knowing I was a quilter, asked if I had any thread to fix his patch. Well, I didn't have the right color but I told him I would sew it for him in a way the color of the thread would not matter.
While I was making those repairs, two of the youth staff came over and asked me to teach them to sew their own patches and badges in place. You can bet I was very happy to teach them.
Now it was my Cub's turn to learn to sew. I bought about six meters of red felt and made a pattern that only needed sewing across the two shoulder seams.
I was happy to see the moms encouraging and coaching but letting the boys do the work themselves. I did not hear one word of complaint from any kid.
Sitting at the back table, checking the boy's books, is my Right-hand-man, committee chair and Assistant Cub master all in one. He is supervising the next stage, the hammering of the grommets. Ah, the hammering part was the final reward for getting the sewing part done.
Next Pack meeting we will fix the ties in place while learning some basic knots. Maybe I will even get a picture of a Cub in a vest.
I am not so old that I can not look back to my own childhood and remember how I felt while using something I had made, thinking, "and I did this all by myself"! Good going boys!
Subscribe to:
Posts (Atom)